Note: Only Admin users can add Locations to an account. An Admin user must contact CareerPlug Support to delete Locations in their account.
Every job posted through CareerPlug needs to be associated with a Location. When your job is sent to job boards, the associated Location is copied over, ensuring your job is posted in the correct city and ZIP Code on job boards.
To add a new Location to your CareerPlug account:
1. Navigate to Settings (gear icon) > My organization > Locations.

2. Click the plus (+) icon in the upper left corner of the page.
%20(top%20only)%20(plus%20arrow).png?width=670&height=176&name=Settings%20-%20My%20Org%20-%20Locations%20(6.12.26)%20(top%20only)%20(plus%20arrow).png)
Don't see a plus (+) icon on your Locations page? Your account might require approval to add a location. Contact CareerPlug Support and include all required information for your new location (Name, Location Number/ID, City, ZIP Code, Country) in your request. We can help you add it to your account!
3. In the Purchase location pop-up, click the Billing details page link to be redirected to your Plan Details page.
.png?width=394&height=187&name=Purchase%20location%20pop-up%20(link%20arrow).png)
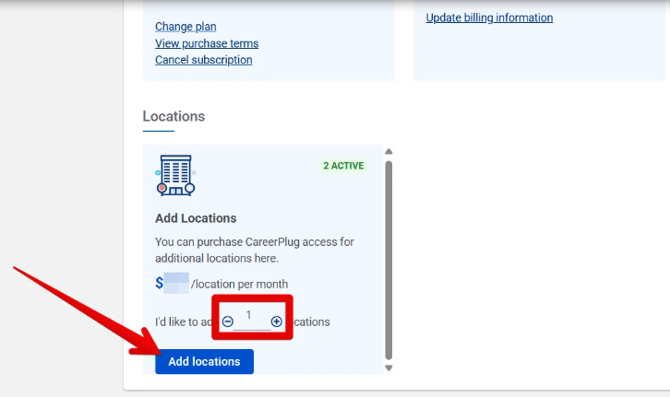
4. Scroll to the bottom of the Plan Details page and enter the number of new locations you want to add in the open field. You can also click the plus (+) and minus (-) icons to choose how many new locations you want to add.
5. Click the Add locations button.
6. Verify the details in the Purchase Location pop-up and click the Confirm Purchase button.
.png?width=398&height=360&name=Purchase%20Location%20pop-up%20(Confirm%20Purchase%20arrow).png)
7. Navigate back to Settings (gear icon) > My organization > Locations.
8. Click the plus (+) icon in the upper left corner of the page.
9. Fill in all fields for your new Location:
- Name
- Location Number/ID
- Street Address
- City
- State
- ZIP Code
- Country
- Phone Number
%20(Top)%20(highlights).png?width=670&height=417&name=Create%20New%20Location%20(10.14.25)%20(Top)%20(highlights).png)
The Name of your location can be a city name, a building name, or a cross street near it — it's up to you. The Location Number/ID can be the location's name if you don't use unique location identifiers.
10. Add Participating Users to your new Location by typing their name in the field and selecting it from the drop-down menu. These are users who you want to have access to jobs and applicants associated with this Location.
Full and Limited Access users must be associated with at least one location to take any action or view applicants on associated jobs. If you're unsure who you'd like to give access to, you can always do this later.
11. If your CareerPlug account is integrated with Universal Background Screening, enter the Background check account and Background check username in the associated fields. If your account doesn't use Universal Background Screening, skip this step.
12. Click the Save button in the bottom-right (or top-right) corner of the page.
%20(Bottom)%20(highlights).png?width=670&height=367&name=Create%20New%20Location%20(10.14.25)%20(Bottom)%20(highlights).png)
Your new location is ready to use!
Learn more about using Locations and Operating Areas in CareerPlug.