Reviewing, contacting, and moving applicants through your hiring process
If you've posted a job and you're getting applicants — congratulations! Your next step is to decide which ones you want to move forward in your hiring process, and deactivate the rest.
Here's a 6-minute video on how to move applicants through your hiring process:
In this article:
- What's a hiring process?
- Review step
- Assessment step
- Making comments
- Phone screen/Interview step
- Interview Scorecards
- References step
- Offer step
- Background step
- Hire step
What's a hiring process?
A hiring process is the set of steps that all applicants who apply to a job must go through before they are hired.
Each new applicant is assigned a step-by-step hiring process, complete with prewritten email templates to help you efficiently correspond with your applicants, as well as prebuilt assessments and interview scorecards to help your evaluate your applicants. If you're new to CareerPlug, your hiring process already includes these features by default.
However, if your company already has an effective system for hiring in place, you can easily customize your hiring process to support your needs.
We recommend only advanced users edit their account's hiring processes.
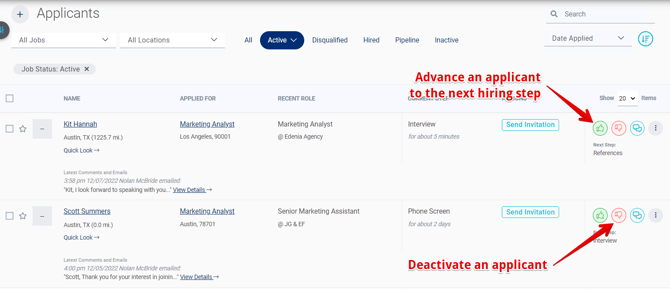
At any point in the hiring process, you can view the Current Step an applicant is in, as well as the next Actions to take, on your Applicants page.
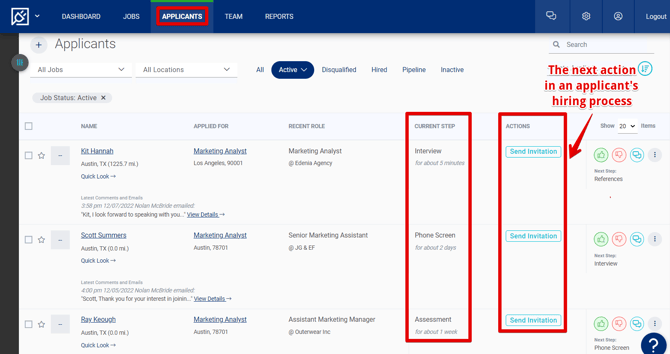
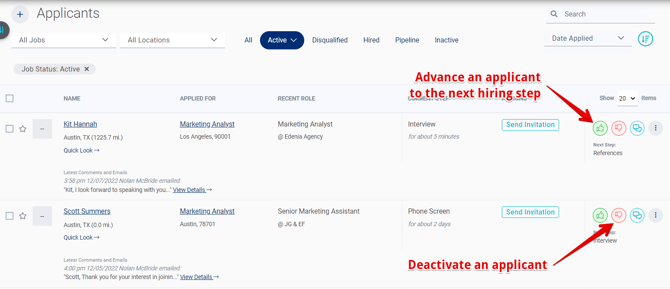
You can also advance an applicant to the next step with the thumbs up icon or deactivate them with the thumbs down icon.
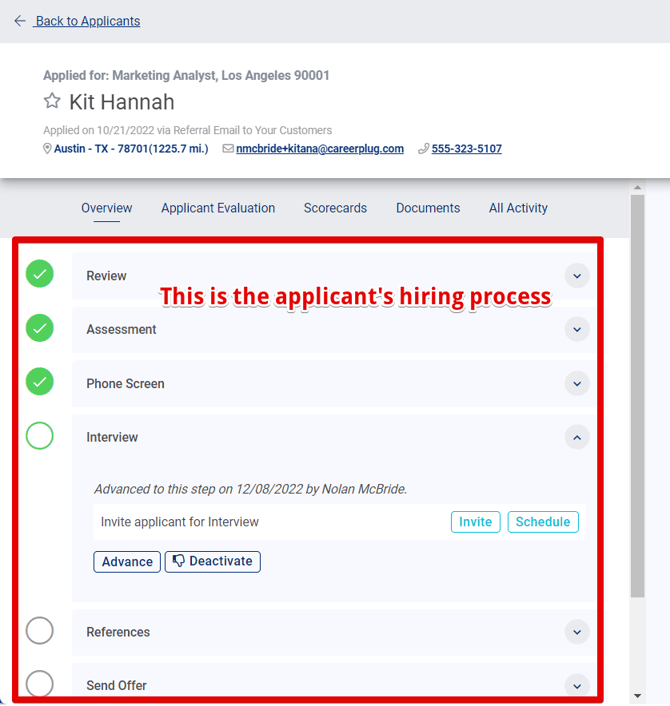
If you wish to view the full hiring process, click on the applicant's name.

Review step
When you have new applicants to review, you'll notice a green banner at the top of your Applicants page.
Click the Start Review button to view each new applicant’s resume as well as their answers to prescreen questions. This allows you to quickly review your new applicants and decide whether to move them forward in your hiring process or reject them.

After you review each applicant's resume and prescreen answers, you'll take one of two actions on each applicant:
- Thumbs up — Advances the applicant to the next step in the hiring process
- Thumbs down — Deactivates the applicant and gives you the option to send them a rejection letter (we recommended always sending a rejection letter)
You can always review the template email, and it won't be sent until you click the Send Email button.
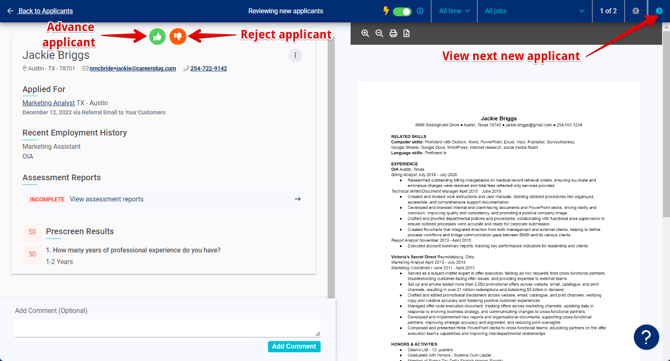
You have the ability to filter new applicants by when they applied or the job they applied to using the drop-down menus at the top of the page.


Want CareerPlug to automatically email the applicant after you advance or deactivate them? Click here to learn about setting up an automation.
If you decide not to give the thumbs up or thumbs down when reviewing a new applicant (as seen above), you can always review and advance them directly from your Applicants page.
You can review the applicant's answers to the prescreen questions you included with your job posting by hovering over the numerical score to the left of their name.
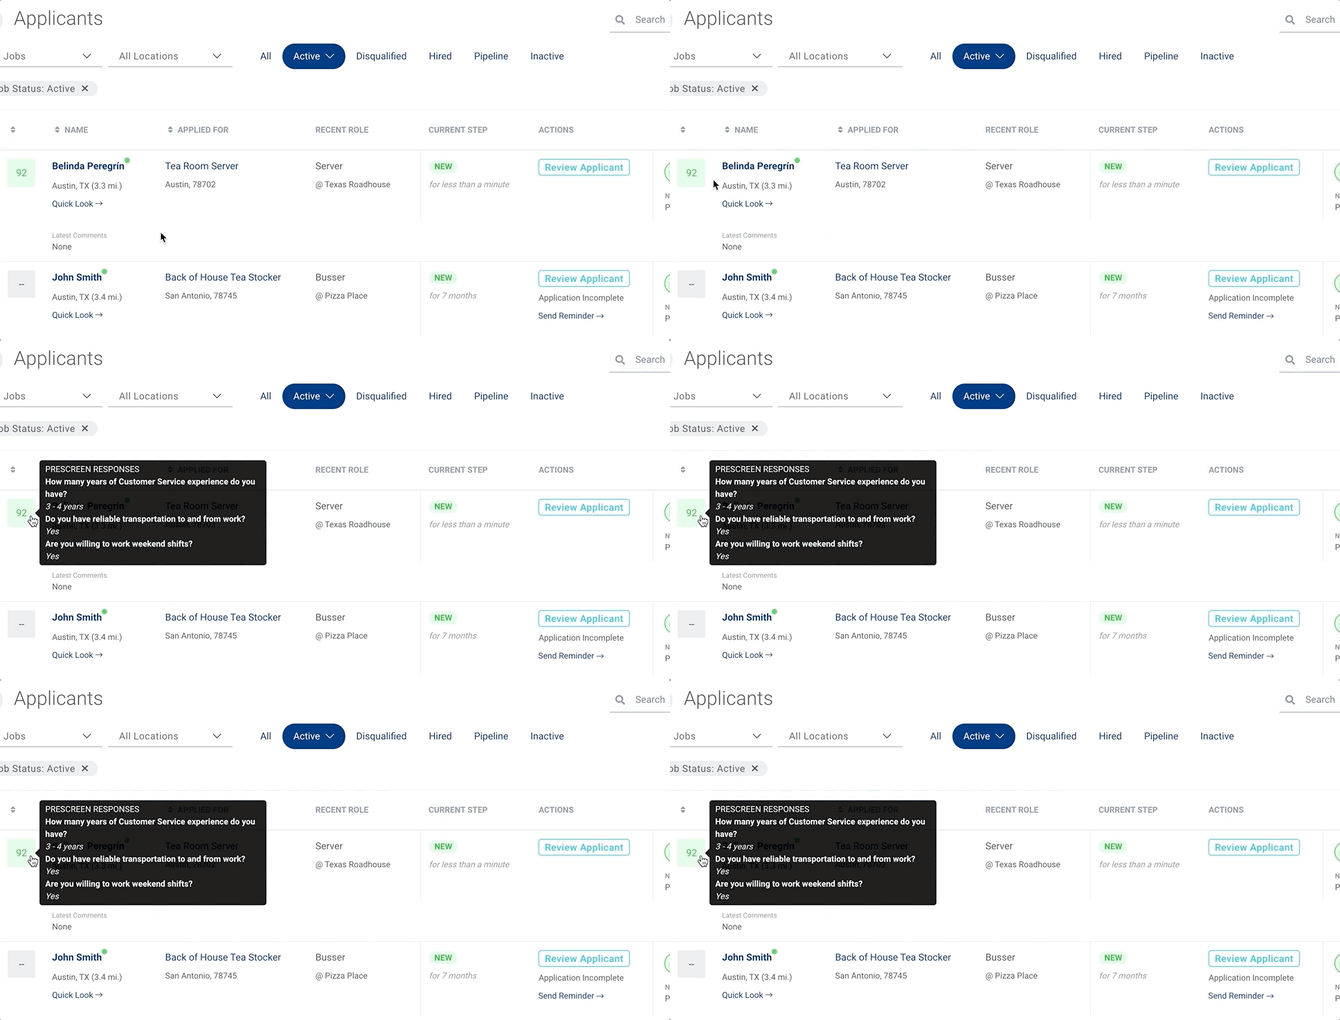
You can review their resume easily by clicking the Quick Look link under their name.

If this applicant is satisfactory, click the thumbs-up icon at the far right.
If at any point you are not interested in moving forward with an applicant, simply click the thumbs-down icon to remove them from your list of visible applicants.
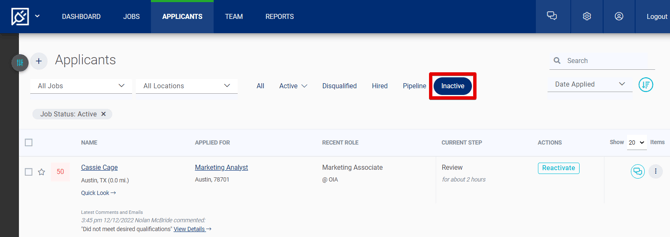
They will now be considered an Inactive applicant and will only appear on your Applicants page if you choose to view Inactive applicants.
You can easily search for any applicant who has applied to one of your jobs using the field in the top right corner of your Applicants page, or use any of the filters and sorting options at the top and left side of the page.
Need help finding an applicant? Click the " X" on the right edge of the Job Status: Active filter to remove it. This filter — which is on by default any time you log into CareerPlug — hides applicants from your closed, passive, and draft jobs from view.
Assessment Step
Once you've reviewed an applicant, the next step in the hiring process is to invite them to complete the assessments that you've selected for your job. When you click Send Invitation or Invite (from the applicant's profile), you'll be prompted to send a pre-written email and text message inviting the applicant to complete the assessments.
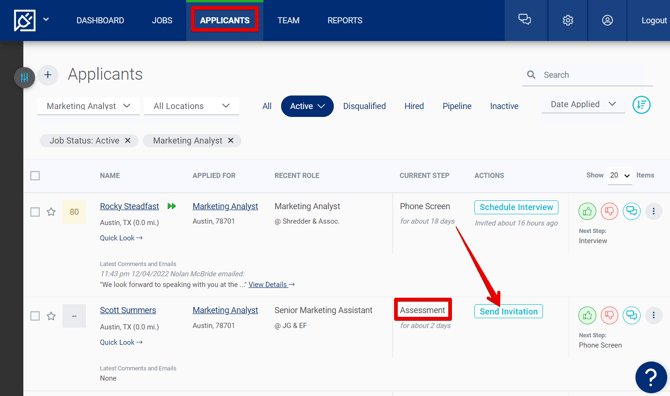
You'll always be able to review and edit pre-written templates before you send any messages to the applicant.
You'll repeat a similar strategy for each additional step of the hiring process to stay organized.
Advancing an applicant to another hiring step is used for your reference and internal tracking. You must click the buttons to invite an applicant to take assessments and complete interviews. Clicking the thumbs-up and advancing an applicant in the hiring process does not trigger any automatic applicant communication (until you get to the Hire step, in which some cases the applicant may receive an email to log into CareerPlug to complete paperwork).
Making Comments
At any point in the hiring process, you are able to make comments on the applicant that can be viewed by anyone who has access to the applicant.
Click the three-dots icon and select the Add Comment option from the drop-down. Enter your comment, and click Save.
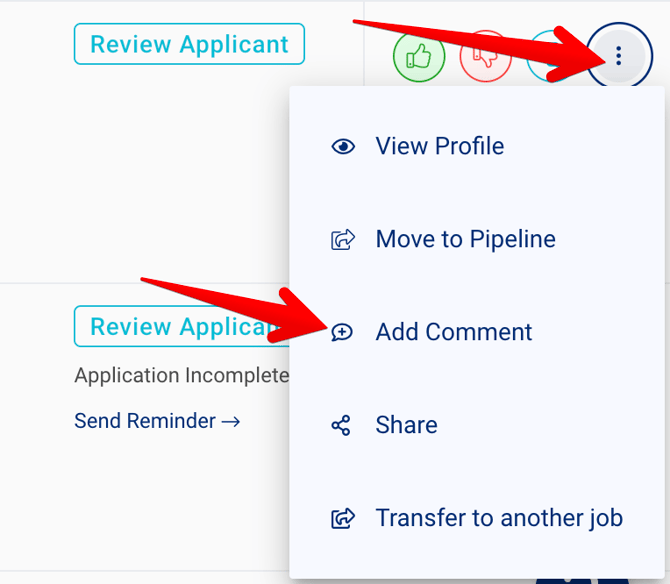
The latest comment will appear on the main Applicants page, as well as the most recent email sent to or from the applicant. The name of the person who commented or sent the email will be noted, as well as the date/time.

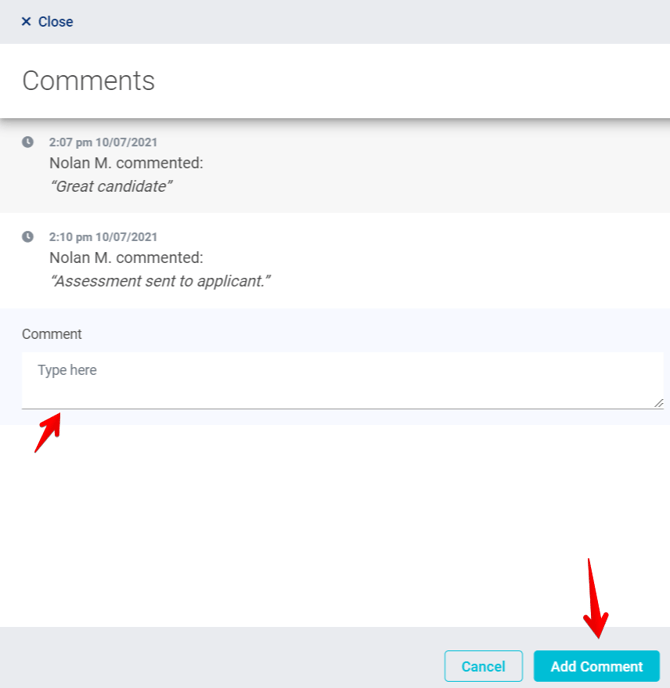
To see the full log of comments or entirety of the email, click the View Details link next to either snippet. In the Comments drawer, you can review all comments and add new comments.
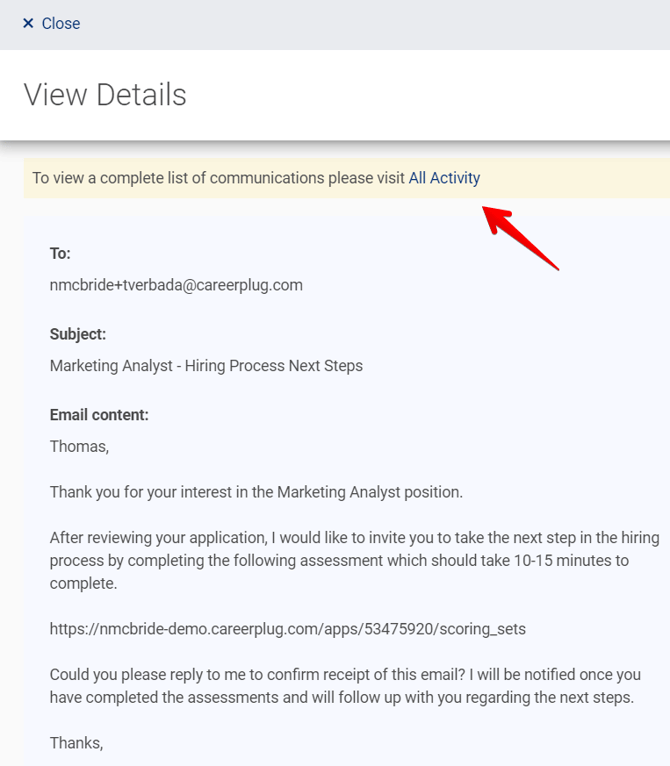
In the View Details drawer, you can review the full email. Though you cannot reply to emails from this drawer, you can navigate to the All Activity tab by clicking the hyperlink.
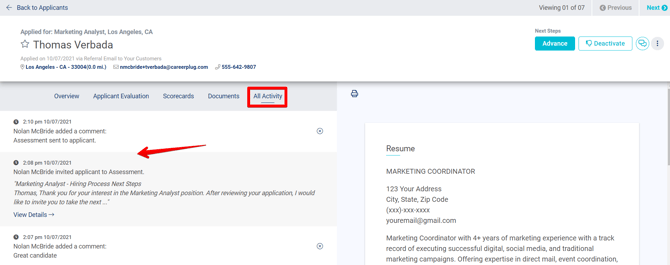
All comments and emails will appear under the All Activity tab in the applicant profile, along with the date/time and the name of the person who commented or sent the email.
Phone Screen/Interview Step
In many hiring processes, the next steps following assessments are the Phone Screen (a basic phone interview with your applicant) and the Interview (an in-person or video interview with your applicant).
Click Send Invitation to open up a pre-written message template that asks the applicant for some days and times they would be available for the interview.

You will correspond with the applicant from your own email inbox, but any text messages you need to send must be sent through CareerPlug.
Once you and your applicant have agreed upon a time, you can click the Schedule Interview button on your Applicants page (or the Schedule button in the applicant's profile) to send a confirmation email and calendar invite to the applicant.
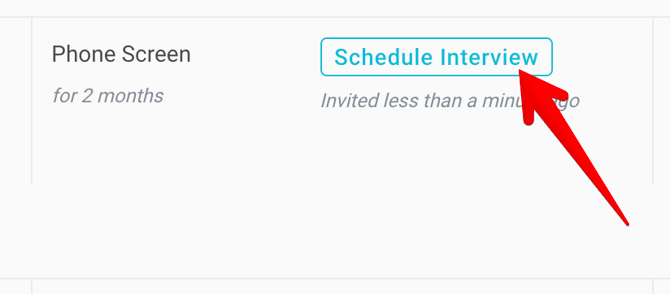
You'll be able to review and edit the pre-written message template before you send it to the applicant.
Interview Scorecards
Scorecards are interview guides filled with suggested questions for you to use while you are interviewing your applicant. You can rate your candidate’s responses, make comments on the scorecard, and save their scorecard for other managers to access.
In hiring steps with interviews, you have the option to complete a scorecard for an applicant. From your Applicants page, click the Fill Scorecard link in the Actions column.
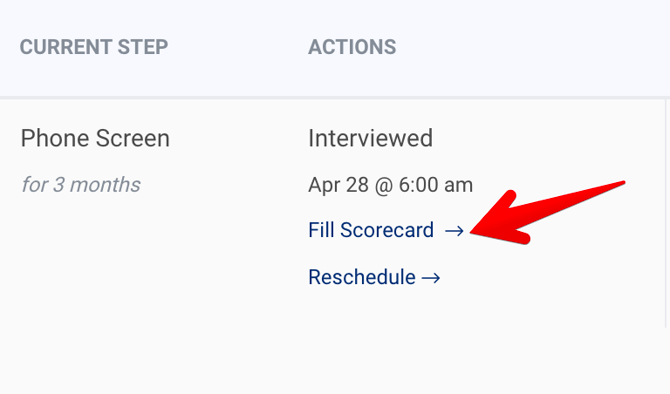
This will bring you to the associated step in the applicant's profile page. Click Complete Scorecard.

You can view all scorecards for an applicant on the Scorecards tab.

References Step
If you would like to move forward with a candidate after their interviews, you can request their references on the References step. Use the Invite button to send a pre-written email to the candidate asking for the contact information of at least 3 professional references. Once you have received these references, use the "Reference Check Guide" scorecard to guide your conversation with each of the candidate's references.
Offer Step
If you have interviewed an applicant and their references check out, you have the option to send them an offer of employment. CareerPlug allows you to send digital offer letters to applicants from within your account. The first step is to create an offer letter template. This template can be used to send digital offer letters to multiple candidates and can save you valuable time as well as streamline consistency in offer letters among hiring managers. Learn more about sending digital offer letters here: Offer Letter Getting Started Guide
The Offer step will be blank until you have created an offer letter template by navigating to Settings > Templates > Offer Letters and adding at least one offer letter template.
Background step
Although CareerPlug does not conduct background checks on applicants, we do partner with Universal Background Screening, which specializes in employment background checks and drug testing for companies nationwide. More information.
Hire step
When you are ready to hire an applicant, click the green Hire button. This will move the applicant to your Users page (Settings > My Organization > Team). Marking a candidate as hired is extremely important in keeping the data on your Reports and Dashboard pages are accurate. Make sure to mark all of your hires as Hired in CareerPlug.

None of these steps are necessarily required. If you are positive you want to hire an applicant early in the hiring process, you can always skip steps.
Now that you're familiar with CareerPlug's default hiring process, here's more information on creating your own custom hiring process.